
Getting Started
Accounts, navigation, settings and sessions — the foundations every REGREP module depends on.
Read the guide →Preparing, validating and submitting financial account information under the EU automatic exchange framework.
DAC2 is the EU framework for the automatic exchange of financial account information between member states. Reporting financial institutions identify accounts held by tax residents of other jurisdictions and report them annually to their local tax authority, which passes the information on.
The REGREP DAC2 module takes your account data as a spreadsheet, checks it against the structural and regulatory rules, tells you what is wrong with it, and produces the OECD-compliant XML package for submission.
The module works in three stages, shown as three cards on one screen: data input, regulatory validation, and conversion to the submission format.
The fields DAC2 requires are:
| Field | Why DAC2 needs it |
|---|---|
| Legal Entity Name | Identifies the reporting financial institution in the XML. |
| LEI Number | The 20-character Legal Entity Identifier. Check that the field validates — an invalid LEI is carried into the export. |
| Type of Entity | The entity classification for reporting purposes. |
| Country of Incorporation | Determines the transmitting jurisdiction. |
| Company Type | The business entity structure. |
| Tax Identification Number (TIN) | The reporting institution's own TIN. |
| GIIN | The Global Intermediary Identification Number used for FATCA alignment. |
| FATCA Filer | The filer status or code. |
Save the tab before leaving Settings.
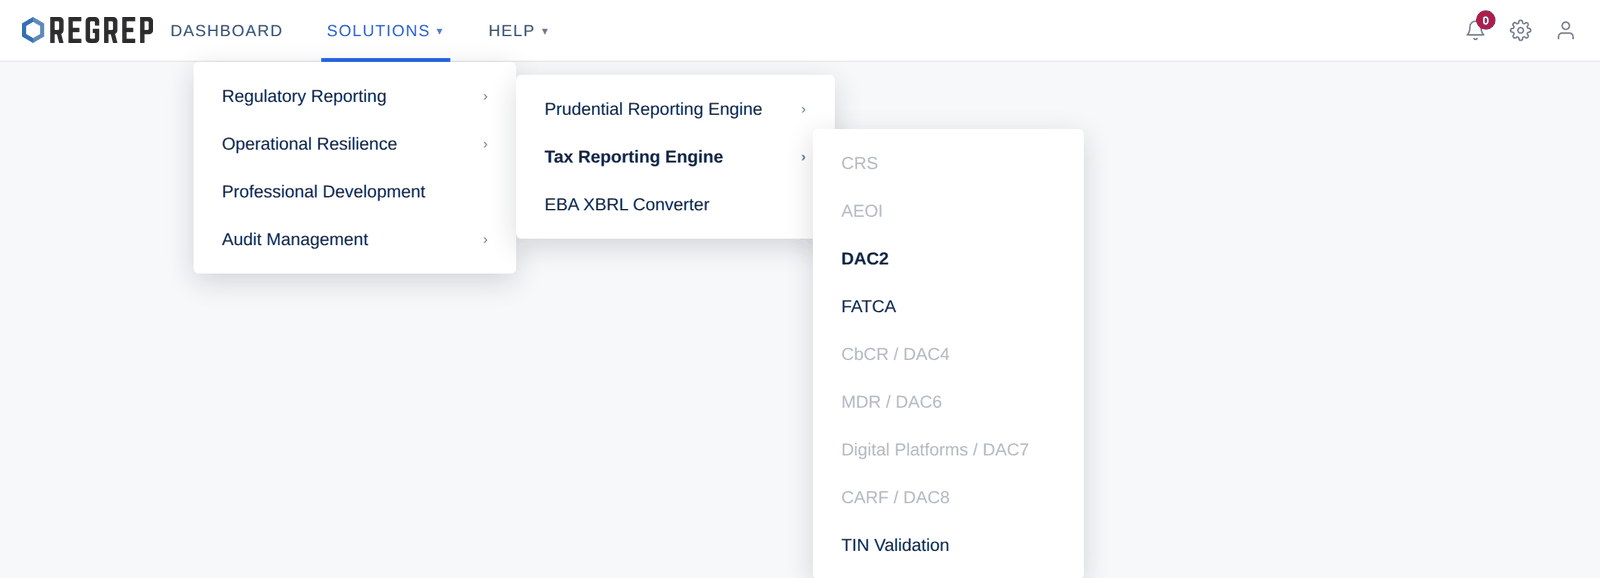
Solutions → Regulatory Reporting → Tax Reporting Engine → DAC2.
A DAC2 session is one submission: a reporting year, a submission type, and the data that goes with it. Corrections to a submission you have already filed are handled as separate, linked sessions rather than by editing the original — see section 2.2.
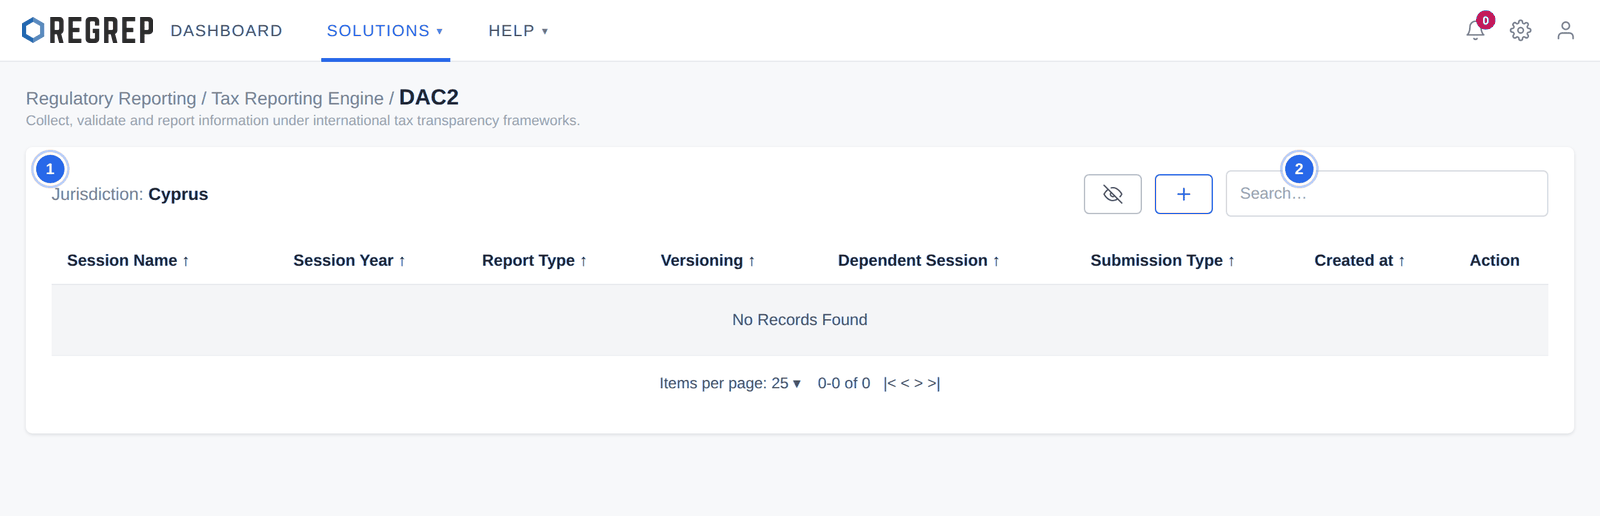
The list shows, for each session, its name, reporting year, report type, version, the parent session where one applies, the submission type, and when it was created and last opened. Two row actions are available: open the session, and delete it.
Warning — this cannot be undone
Deleting a DAC2 session removes it and its uploaded data permanently, and there is no archive tab in this module to fall back on. If the session produced a package that has been filed with the tax authority, keep it — it is your record of what was submitted, and a later correction session needs it as its parent.
Use this for the first submission covering a given reporting year.
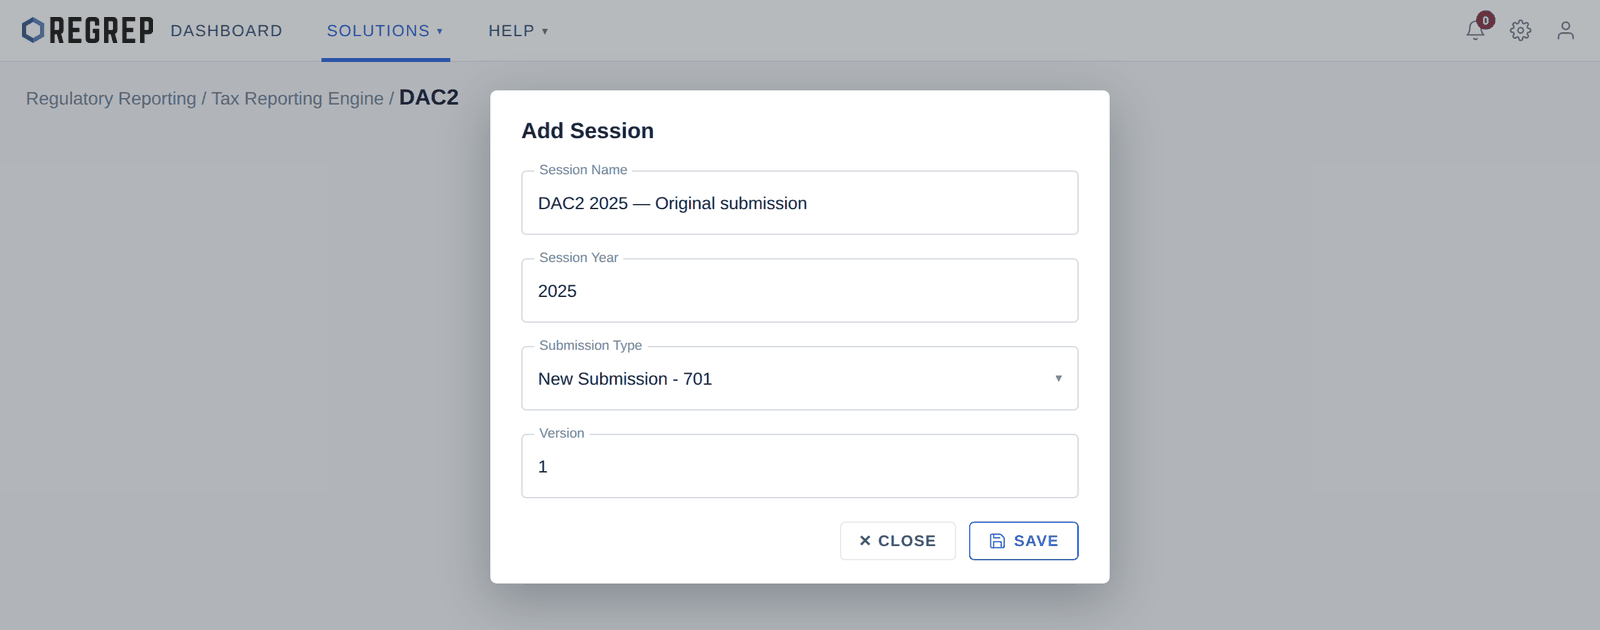
| Field | What to enter |
|---|---|
| Session Name | A descriptive name. Including the year and the words "original" or "correction" makes the list readable later. |
| Session Year | The tax reporting year the data covers — not the year you are submitting in. |
| Submission Type | New Submission - 701. |
| Version | Fixed at 1 for an original submission. |
Select SAVE. You are taken to the file upload screen.
If an error or omission is found in a submission that has already gone to the tax authority, do not edit the original session. Create a correction session linked to it. The link preserves the audit trail and tells the receiving authority which report is being corrected.
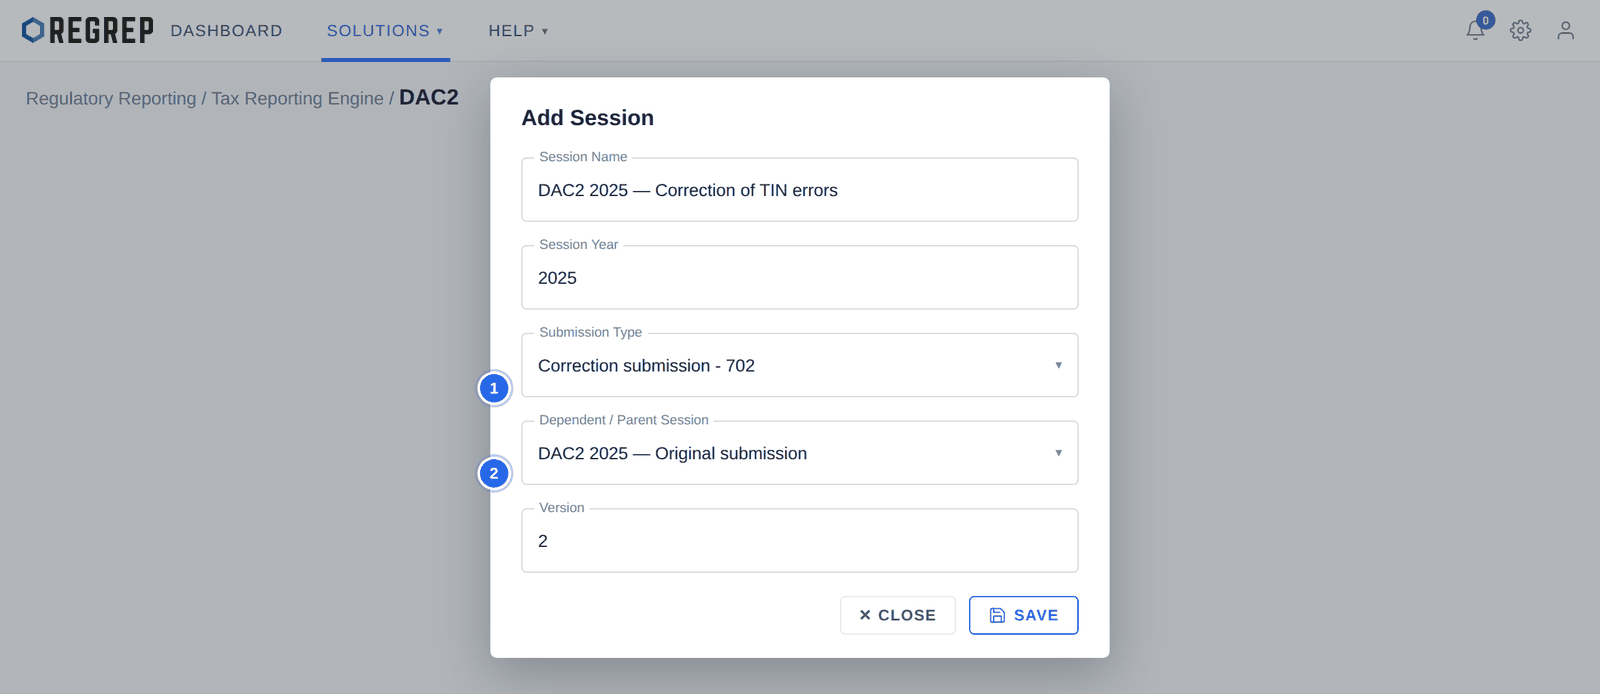
| Field | What to enter |
|---|---|
| Session Name | Something that identifies what is being corrected, for example "DAC2 2025 — Correction of TIN errors". |
| Session Year | The same reporting year as the parent session. |
| Submission Type | Correction submission - 702. |
| Dependent / Parent Session | The original session in which the error occurred. |
| Version | Increments automatically — 2 for the first correction, 3 for the next, and so on. |
A newly created session opens on the upload screen.
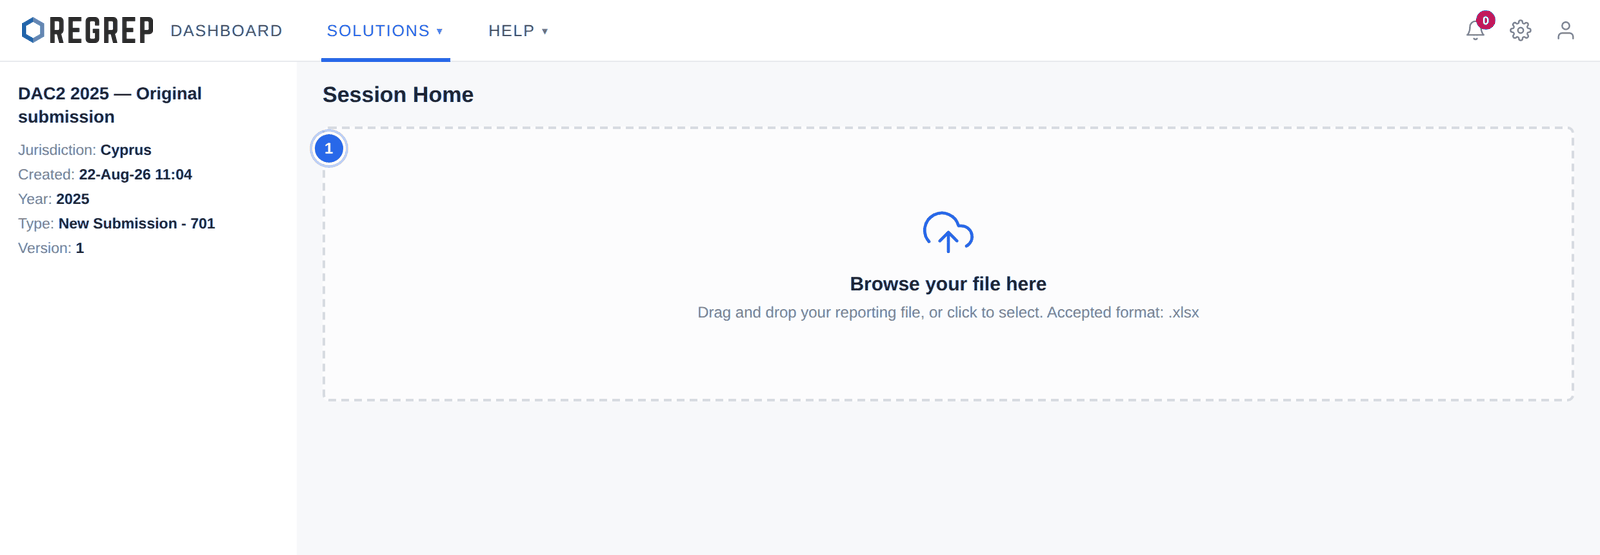
The sidebar on the left shows the session's parameters — jurisdiction, creation timestamp, reporting year, submission type and version — so you can confirm you are loading data into the right session before you upload.
Once the file is attached, REGREP begins processing immediately and the screen changes to the three processing cards.
The three cards run in order. Each has to be satisfied before the next is meaningful.
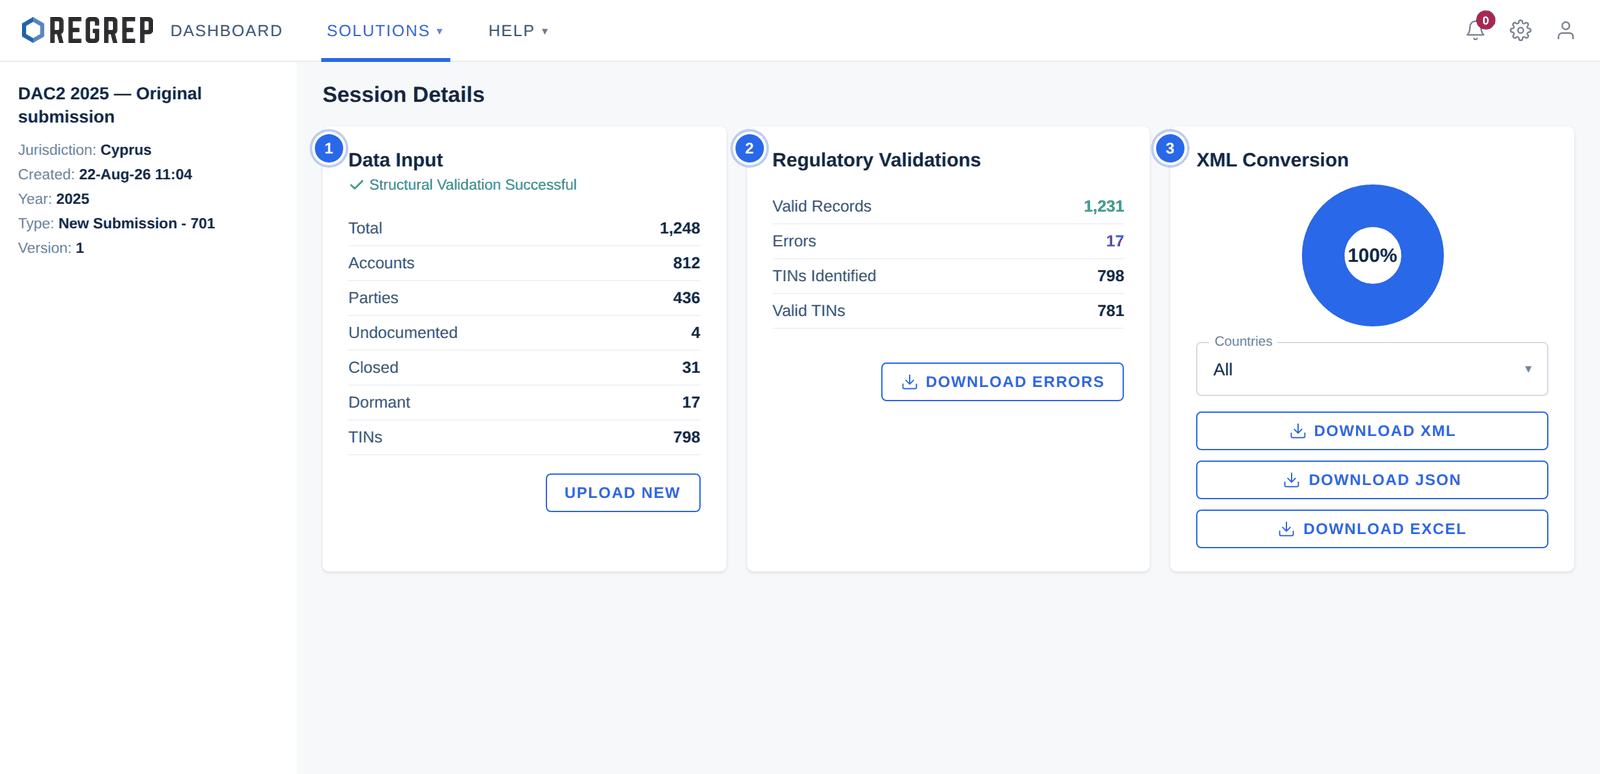
This card confirms the file was structurally readable and reports what it contained. A progress indicator runs during ingestion and is replaced by "Structural Validation Successful" when the file has been read.
| Count | What it means |
|---|---|
| Total | All rows processed from the file. |
| Accounts | Financial accounts identified. |
| Parties | Account holders and controlling persons. |
| Undocumented | Accounts with insufficient documentation to establish tax residence. |
| Closed | Accounts closed during the reporting period. |
| Dormant | Accounts classified as dormant. |
| TINs | Tax identification numbers detected across all parties. |
UPLOAD NEW replaces the file with a revised one and re-runs the whole process.
This card checks the ingested records against the DAC2 reporting rules — formatting, structure and logical consistency.
| Figure | What it means |
|---|---|
| Valid Records | Rows that pass every regulatory check. |
| Errors | Rows that fail at least one check. These will not be included in a compliant package. |
| TINs Identified | The total number of tax identification numbers found. |
| Valid TINs | How many of those pass format validation for the jurisdiction they claim. |
Working through errors
Select DOWNLOAD ERRORS to export the error log. It lists each failing record and the reason it failed.
Correct the records in your source data.
Return to the Data Input card and select UPLOAD NEW with the corrected file.
Repeat until the error count is zero, or until every remaining error is one you have consciously accepted.
The third card builds the submission package. The gauge shows conversion progress; the Countries filter lets you produce a package for a single reportable jurisdiction or for all of them at once.
| Download | Use it for |
|---|---|
| DOWNLOAD XML | The OECD-compliant XML package. This is the file you submit to the tax authority. |
| DOWNLOAD JSON | The same data in a structured format, for API integration or internal record-keeping. |
| DOWNLOAD EXCEL | A readable summary workbook of the validated data, for internal review and sign-off. |
Confirm Settings → Corporate Information is complete and saved, and that the LEI field validates.
Create the session: name, reporting year, New Submission - 701, version 1.
Upload the account data file (.xlsx).
Check the Data Input counts against your source system.
Review the Regulatory Validations card. Download the error log if there are errors.
Correct the source data and re-upload. Repeat until you are satisfied with the error count.
Have the submission reviewed by someone other than the preparer, using the Excel download.
Download the XML package and check the reporting institution details inside it.
Submit to the tax authority through their own portal.
Record the submission reference against the session, and retain the session — a later correction will need it as its parent.
DAC2 files are unlike the other data you load into REGREP. They contain named individuals, their addresses, their dates of birth, their tax residences and their tax identification numbers, together with their account balances. That is personal data under the GDPR, and some of it is financial data about identifiable people.
The practical consequences for anyone operating this module:
Upload only the data needed for the reporting obligation. Do not load a fuller extract because it was easier to produce.
Treat the downloaded error log and the Excel summary the same way you treat the source file. They contain the same personal data, and they are the copies most likely to end up on a desktop or in an email.
Keep downloaded packages in the location your firm has designated for regulated records, not in a personal downloads folder.
Delete local working copies once the submission is filed and your retention copy is in place.
Restrict access to the DAC2 module to the people who need it. Access is controlled through Team Management.
| Symptom | Likely cause and fix |
|---|---|
| The upload fails or the file is rejected outright | The file is not .xlsx, or its structure does not match the expected template. Check the format and the column headings. |
| Account and party counts are lower than expected | The source extract is incomplete, or rows were filtered out during export. Reconcile against the source system before continuing. |
| Many TINs are flagged invalid for one jurisdiction | Usually a formatting problem in the extract — leading zeros stripped by Excel is the classic cause. Check how the column was exported. |
| Errors persist after correcting the data | Confirm you re-uploaded the corrected file with UPLOAD NEW rather than leaving the original in place. |
| The XML is missing or has wrong institution details | Settings → Corporate Information is incomplete. Complete it, save, and re-run the conversion. |
| The tax authority rejects the package | Check the reporting year, the submission type, the LEI and the TIN in the XML header. For a resubmission, use a 702 correction session linked to the original rather than a new 701. |
| Version | Date | Change |
|---|---|---|
| 2.0 | January 2026 | Rewritten to start at the module. The navigation and Settings chapters move to the Getting Started guide. Adds module entitlement, a data protection section covering the error log and downloaded packages, guidance on unavailable TINs, a full submission workflow, and troubleshooting. Clarifies that REGREP produces but does not transmit the submission, and that a deleted DAC2 session cannot be recovered. Screenshots refreshed using fictional firm data. |
| 1.0 | — | Original DAC2 manual. |
REGREP is an independent software provider. This manual describes how to operate the platform and is not legal, tax or regulatory advice. Confirm scope, thresholds and submission dates with your competent authority before you file.
The rest of the documentation set.
Accounts, navigation, settings and sessions — the foundations every REGREP module depends on.
Read the guide →Calculating own funds, fixed overheads, K-Factors and concentration risk, and producing regulatory submissions.
Read the guide →Assessing the harms your firm can cause, and the capital and liquidity you hold against them.
Read the guide →Producing the public disclosure of your capital position from the Pillar 1 and Pillar 2 work already done.
Read the guide →